Wednesday, July 21, 2010

Card Organizer


I've been working on a card organizer that utilizes 6 x 9" envelopes and chipboard. I finished this late last night, so the picture are only of the front, but I hope to get you better photos of it tonight. There is an envelope for each month that is decorated on the front and back, but the back is a list of lines so that you can make note of the dates you need to send a card for that month. I'll be listing it over on eBay or Etsy, but I haven't gotten that far yet. :0)

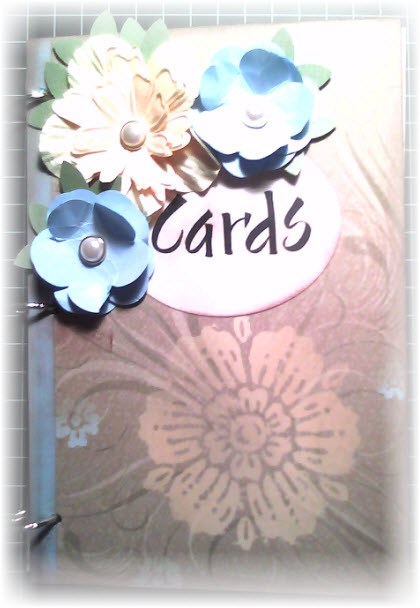
Here is a sample of the monthly envelopes inside the album. I tried to use some techniques that are out of my norm. I used lots of stamping and distressing.


I'll try to get more pictures ready for later today.

If you're intersted in knowing how I made this, please let me know.


Tuesday, July 20, 2010

Two Challenge Tuesday #8 and Tutorial

Hello All! Today's Two challenge Tuesday is sketch and technique challenge. Use the sketch below and use a background stamp. Here is my sample and the steps I took to make the card. I used to be afraid of background stamps because I struggled to get an even image.
First, here is the sketch to today's super simple card.

I started by scoring my paper.

In order to make sure that the inked image only shows on the side of my card that I want it to, I masked it with a scratch piece of paper.


Then I inked up my background stamp with a good layer of ink.


Lined it up with the edge of my guide (masked), and applied even pressure, rubbing the stamp back and forth without picking it up off the paper.


Now this is what my card looks like. You'll note that the background image doesn't go all the way to the bottom of the card, but that's fine since there will be a layer of patterned paper covering that section.


Here is the front of the card with the pattern paper in place


Next I stamped my sentiment and punched it out. I then inked the edges with the same color ink that I used to stamp my background.


Here is the completed inked sentiment.


Then I used the horizontal slot punch to make the "buckles" on the sentiment.


I slipped my ribbon through the holes.


Used glue dots to secure the ribbon to the card, and I'm done.


How will you answer this challenge?


Monday, July 19, 2010

Because I Care


Today I'm sharing a card with you that I made using my newest stamp set called Because I Care by SU. I love hydrangeas, so this stamp set was calling my name the minute I saw it! Because of all the detail in the stamp I didn't color it. I worked with Krafy and Bravo Burgundy cardstock and Timber Brown Stazon ink. I used punches, embossing folders, border punches and pop dots for the embellishments, and that's it. I actually like this card. For me it was a stretch to make a card taller and narrower than the traditional 4 1/4 x 5 1/2, but I think it works.

What do you think?


Sunday, July 18, 2010

Sunday--Challenge Card

Hello All! I worked on a card that works for 3 different challenges.

  1. Sketch Saturday: Sketch #112

  2. Stamptacular Sunday Challenge: Ice Cream Challenge

  3. Split Coast Stampers Color Challenge CC46: Pink Passion and Only Orange


Let me know what you think!

Saturday, July 17, 2010

Challenge Cards

Hello All! Today's all about the card challenges I participated in for this week. I'm working on a few more, but here are some that I finished up this morning.

This card uses the sketch from the blog Stamptacular Sunday Challenge. It is a little hard to see in the first picture because the base of the card is Whisper White. Anyway, the card measures 5 1/2 x 5 1/2" and the pattern paper used is from DCWV. I used the Stampin Up! set called Elements of Style.


This next card is for the Penny Black Saturday Challenge # 109. I followed the sketch for the most part, but I did move where the text/sentiment was placed as I liked it under my image.


Let me know what you think!

Friday, July 16, 2010

Formula Friday # 2--Simple Masculine Card

Hello Everyone! HAPPY FRIDAY! Today's fast formula is for a simple masculine card. When we were getting ready to move I knew that I had to make Birthday cards for a card swap for my stamping group. I needed to make two months worth of cards before I could pack up my scrapping/stamping supplies and let's just say I ran out of creative juices after the more elaborate month's cards. So, I decided to go with an easier card. I started and finished 12 of these cards in less than an hour. A personal best for me and I actually like the final product.

The colors aren't showing up very well, but I used Stampin Up! Dusty Durango, Night of Navy, Soft Suede, and Kraft cardstock and then pattern paper from K & Company and buttons from my stash. Here is the final product from this month's swap.


This is an A2 card. The base is folded at the top. I used Timber Brown StazOn stamp pad. The layer measurements are below.

  • Kraft: 3 x 3 3/4"
  • Soft Suede: 3 1/4 x 4"
  • Night of Navy: 3 1/2 x 4 1/4"
  • pattern paper: 4 x 2"

This recipe can work for any theme or stamp set and comes together really quickly. The longest part for me was picking the right colors. I'm not one that usually combines oranges and blues, and I usually stamp my images on white or vanilla, so this was a combination inspired completely by the pattern paper.


What will you create?

Thursday, July 15, 2010

Thrifty Thursday--Get the Most From Your Paper

As always, I'm looking for ways to stretch my stamping and scrapping supplies and dollars. Today's tip is sometimes an easy thing to overlook. I don't know about you, but for me, the more layers of paper on my cards the more I like the finished product. The problem can be that there is often a lot of paper underneath other layers of paper that is really wasted. For example, in the card I showed you for the Two Tuesday Challenge # 7, the largest layer or cardstock was 4 1/2" square, and only 1/4" shows around the edges. That equals a lot of paper wasted for the two layers that are hidden. The other problem can be the final weight of the card can cost you additional postage to mail. My suggestion, cut out the center of the bottom layers and use them as scraps for punches or stamping. Some of you have cutting machines and accessories that will allow you to cut perfectly from the center. I don't, so I use an Exacto knife.

Here is my paper saving from Tuesday's card.


Repeated for the next layer as well.


To look from the top, you'd never know the layers aren't full.


Share your thrifty tips with me!

Wednesday, July 14, 2010

PaperTake Weekly Blog Challenge Card

Second post for today.

I stopped over at PaperTake Weekly's blog and found that this week's challenge is a Garden Theme. I decided that was a perfect excuse to play with my Penny Black stamps. I also practiced my coloring and blending skills with my stamp pads and blender pens. This is the result. Nothing fancy.


I used Baja Breeze and Old Olive cardstock and watercolor paper for the stamped image. I used Making Memories eyelets and Old Olive 1/4" grosgrain ribbon.

Let the Pictures Tell the Story

It's been a while since I posted pictures of any of my personal scrapbook pages. I typically show you what is going up for sale, but today's post are pages for my own album.
These are photos from a day spent at the Conservatory with my niece, great niece and great nephew (I know! At 35 who would think I'm a great aunt already! Well I am phenomenal :0) but...). We had a wonderful day and I had my husband's macro lens and 35 mm Cannon.
So, here are the layouts.
I used the positive and negative of a chipboard letter "h" and painted them to match the flowers in the photos. I used eyelet metal letter, and triple matted my favorite photos in the bunch.


I didn't journal and I didn't use additional embellishments because I wanted the photos to do the talking for me. The pages are actually some of my favorite, but I wish these photos of them had turned out better so you could see the detail in the flowers.

Tuesday, July 13, 2010

Two Challange Tuesday # 7

Hello Everyone! Are you ready for our Two Challenge Tuesday? I'm adding a little sweetness to the pot! This is my first challenge with a prize to the winner. Challenge is open until 7/20 when the new challenge is announced.


Your two challenges for this card are:
  1. Use the sketch below
  2. Use the color scheme below


Here is my sample card. I used all Stampin Up papers, inks, and stamps. The flowers are all from Fifth Avenue Floral, and the sentiment is from Small Script. The colors I used are: Baja Breeze, Blue Bayou, Certainly Celery, Chocolate Chip and Very Vanilla.


I stamped the rose in Baja Breeze ink on the background as well as on a piece of watercolor paper. Then I used Blender Pens and the stamp pad to color in the flower.


I added just a touch of glitter to the petals of the rose and cut out a few of the edges of the petals for more depth. Then I placed the cut out rose on pop dots and put it on top of the outline on the background.


What will you do with this challenge?


Monday, July 12, 2010

Monotone Monday

Hello All! What a weekend! BUSY is an understatement! Summer seems to go so quickly and seems to be the busiest time of year for so many. One way that I try to stay calm during the flurry of activities is to take time for scrapping or stamping in my room. It may take me hours to create something, or just a few minutes, but that time always seems to help me refocus on the priorities afterwards.

With the chaos of life in full swing, today's time for playing in my room was pretty limited, so I decided to try using an easier palette of inspiration by limiting the color combinations to think through. Here is the inspiration for today’s card.


Here is my interpretation.


How did I do it?

I used an A2 size. The base layer is Basic Black, alternating with Whisper White in 1/8" increments. The stamp set I used for the sentiment was Short and Sweet. The background stamp is Acanthus by Rubber Stampede, and the chipboard accent is by Maya Road.
I covered the chipboard in black ink, then heat embossed it with Kaleidescope Transparent embossing powder by Stampendous. Then I inked it up again with my embossing pad and added a layer of Detail Black Opaque embossing powder also by Stampendous.
What do you think? What can you come up with?