Monday, September 26, 2011

Heartfelt Thanks Greeting Card

I wanted to make a special card for my cousin who is doing my hair for my sister's wedding on Friday.  Here is the card I made.


I broke out a stamp set I haven't used in a long time.  and paired it with one of my favorite fall colors, Pumpkin Pie.

This will be my last post until after the wedding.  I hope to post for you on Saturday sometime, but I know you'll forgive me if I don't get to it until Sunday.  Happy stamping and please say some prayers that all goes well for the wedding on Friday!

Saturday, September 24, 2011

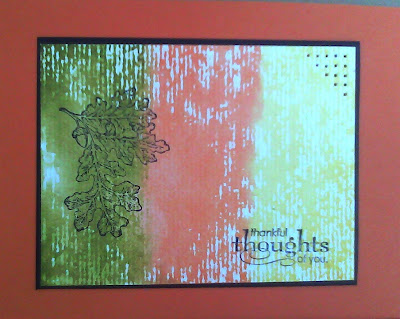
Thankful Thoughts of You Greeting Card Pack

Today I have a set of four cards to share with you.  The CAS136 Challenge at SCS was to make clean and simple cards with leaves.  I was trying a version of my watercolor background tutorial without the last steps of using the embossing folder.  I did quite a few "takes" during my play date with Norma earlier this week, and decided to make a whole set of cards.

I used a few different color combinations.  The colors in the various cards are:  Daffodil Delight, Pumpkin Pie, Old Olive, and Real Red.

 I used the same two stamp sets on each card:  Lovely as a Tree, and Grateful Greetings.
 The cards that I used Old Olive on I used a base of Pumpkin Pie.
 On the cards that I used Real Red ink, I used a base of Real Red as well.
 I chose to round the corners of a couple, and paper pierce the others.
One last look at the set.  Thanks for stopping by!

Thursday, September 22, 2011

Simple Poinsettia Christmas Greeting Card

SoI haven't exactly made progress on my fall cards, but I had an image rolling around in my head for some paper poinsettias I purchased a number of years ago from Oriental Trading Company, so when Norma came over for our play date, I made the cards below.


My first attempt was the Kraft base, and the second one is Hunter Green.  Both Norma and I liked the Hunter Green base.  We both thing the Kraft would be the card of choice if I had stamped on the white rather than the Kraft base.  I'll have to try it another time and see.

These are both very simple cards and the only embellishments aside from the poinsettias is the Real Red 1/4" ribbon, and the glitter that I used to enhance some of the embossed image.
 The stamp set is Heard for the Heart by Stampin Up!
 I used glitter in the center of the embossed images for more sparkle since the leaves of the poinsettias.


 Here is a close up of the poinsettia.


Which card base do you like best?

Thanks for stopping by!

Tuesday, September 20, 2011

Faux Cloisonne Technique: Fifth Avenue Floral Greeting Card

A few posts back I showed you a card I made using the Faux Cloisonne Technique.  Today's card was also made using this technique.

 This is a very different color scheme for me.  Okay...not the lavendar since it's left over from my sister's wedding invitations, but the Going Gray combined with it is new for me. 
 I used Fifth Avenue Floral stamp set and stamped  it onto a magazine image and then heat embossed it in silver embossing powder and cut it out.
 I used an embossing folder on the lavendar layer of paper.  The ribbon is Going Gray taffeta ribbon from Stampin Up!
 I mounted the flower onto a paper doily and then adhered it to my card.
Thanks for looking!  Happy Stamping!

Sunday, September 18, 2011

Thinking of You Pansy Greeting Card

Yesterday I shared a tutorial with you for how to make paper pansy flowers from the butterfly punch by Stampin Up and some ink pads.  Today I'm going to show you how I used the flowers I made in the tutorial.

 I used a base of Eggplant Envy and layers of White and Black.
 I used the bird punch for the leaves.  They are in Pear Pizzaz, and Old Olive.  The leaves that are in Pear Pizzaz are embossed.

 The sentiment is stamped in Elegant Eggplant (THANK YOU NORMA!).
 Here is a close up look at the pansies.
 I adhered them to the card with pop-dots.
One final look.  Thanks for stopping by!  Happy stamping!

Saturday, September 17, 2011

Butterfly Punch Pansy Tutorial

I hinted earlier about what my post later today was going to be.  I've watched a ton of tutorials on this process, but I didn't have the right reinkers or the aqua pen as needed per the tutorials I watched, so I improvised.

The supplies I used for this project are:
  • 3 butterfly punches per completed pansy (in Whisper White)
  • Water spritz bottle
  • Cotton Swabs (instead of Aqua Painter)
  • Elegant Eggplant and Daffodil Delight stamp pads
  • Yellow brads
  • Punch or paper piercer
  • Heat gun (optional)


 I laid out all my punches on a paper towel.
 Then I spritzed them with water.  Not so they were dripping, but damp.
 Start by pushing the center of the butterfly into the yellow with the pad of your finger or with the cotton swap.
 Dip the cotton swab into water and then brush over the yellow to let it bleed into the paper. (Key is that you want a large area of yellow to start with as it will become hidden once you add the purple).
 Here is the punch after brushing with water.
 Here is the whole set of them after I was done with the yellow.
Now move onto the purple with the outer edges of the butterflies. If needed, re-spritz with water to keep them damp.
 Here are the punches after the purple was applied.
 Either wait for the punches to dry naturally or if you're like me, heat them until all dry.  Then lay three butterflies on top of each other and punch in the center to place brad.
 Here is a side angle of punching.
 Set brad in center and then turn butterflies to form flower petals.
 An now you have unique handmade flowers for your projects.
Here are the completed three pansies.  I'll show you the project I use them on tomorrow.  Stay tuned!