Showing posts with label Thrifty Scrapbook Tips. Show all posts

Tuesday, September 25, 2012

Butterfly Paint Chip Greeting Cards


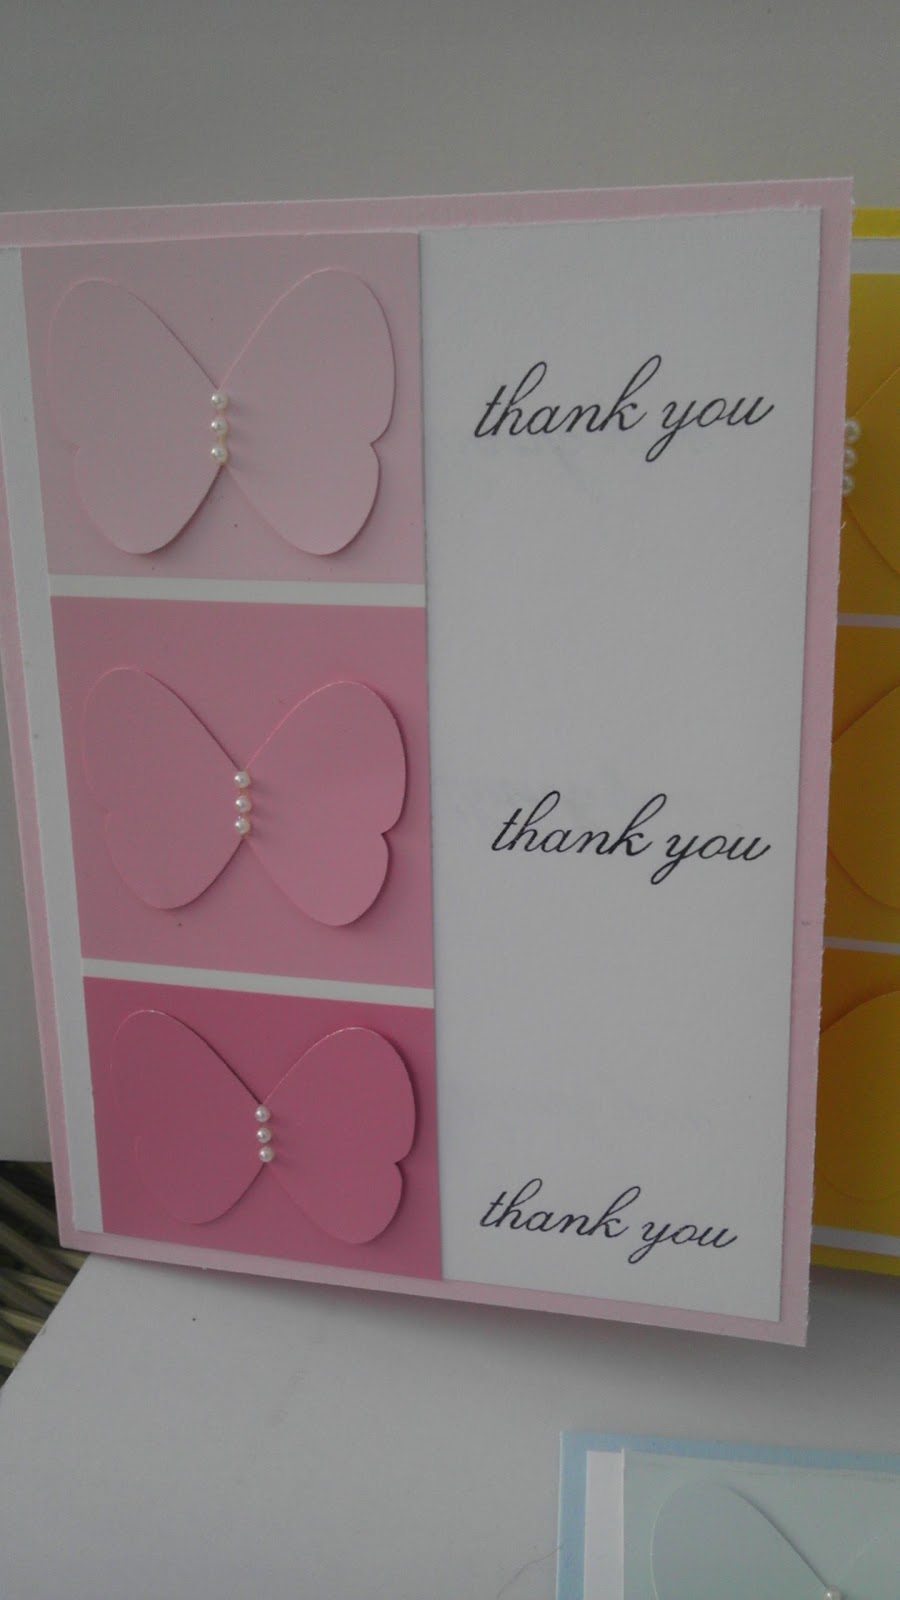
Hello everyone!  Today I'm sharing with you my new fast and favorite cards.  I recycled paint chip samples that didn't make it to my house walls, and I used them to make some simple thank you cards.
 

Here is the set of four I made.  I used card bases of Pink Pirouette, YoYo Yellow, Bashful Blue, and Green Galore. 
 
 
I punched a butterfly shape out of each color on the swatch and accented them with pearl flatbacks
 
 
I used the thank you stamp from Because I Care and stamped thank you along side each butterfly


What do you think?

Thanks for looking and happy stamping!


Saturday, November 26, 2011

Missoni Tag Upcycle Thirfty Birthday Greeting Card


Today I'm sharing with you a card that I used a tag from a Missoni for Target tote bag.  I loved the pattern on the tag, so I decided to use it on a card.

This card also qualifies for the color challenge over at Splitcoaststampers CC350 which is Blushing Bride, Pear Pizazz, and Marina Mist.  I don't have Blushing Bride or Marina Mist, so I used Baja Breeze and Blush Blossom.
 I stamped the base of the card with the rose from Fifth Avenue Floral and used Baja Breeze ink.
 I used the sentiment from Whimsical Words, and the wide oval punch to cut out the birthday greeting.
 I used the eyelet border punch for two additional layers.
Here is another final look at the card.  What will you do to make your stamping/scrapping dollar stretch?

Saturday, September 17, 2011

Butterfly Punch Pansy Tutorial

I hinted earlier about what my post later today was going to be.  I've watched a ton of tutorials on this process, but I didn't have the right reinkers or the aqua pen as needed per the tutorials I watched, so I improvised.

The supplies I used for this project are:
  • 3 butterfly punches per completed pansy (in Whisper White)
  • Water spritz bottle
  • Cotton Swabs (instead of Aqua Painter)
  • Elegant Eggplant and Daffodil Delight stamp pads
  • Yellow brads
  • Punch or paper piercer
  • Heat gun (optional)


 I laid out all my punches on a paper towel.
 Then I spritzed them with water.  Not so they were dripping, but damp.
 Start by pushing the center of the butterfly into the yellow with the pad of your finger or with the cotton swap.
 Dip the cotton swab into water and then brush over the yellow to let it bleed into the paper. (Key is that you want a large area of yellow to start with as it will become hidden once you add the purple).
 Here is the punch after brushing with water.
 Here is the whole set of them after I was done with the yellow.
Now move onto the purple with the outer edges of the butterflies. If needed, re-spritz with water to keep them damp.
 Here are the punches after the purple was applied.
 Either wait for the punches to dry naturally or if you're like me, heat them until all dry.  Then lay three butterflies on top of each other and punch in the center to place brad.
 Here is a side angle of punching.
 Set brad in center and then turn butterflies to form flower petals.
 An now you have unique handmade flowers for your projects.
Here are the completed three pansies.  I'll show you the project I use them on tomorrow.  Stay tuned!

Friday, September 16, 2011

Thrifty Thursday Cloisonne Technique Greeting Card

OK...it's not Thursday, but I found this tutorial  and had to try it!  What a perfect use for old magazines or scraps of paper!  I was inspired by the photo below.

I went through some old magazines, and here is what I came up with.
 My color base is Soft Suede and paired it with Taken with Teal and Whisper White.
 I love the loop border punch, so I used it again on this card.
 The butterfly is a $1 bin buy by Studio G, and the sentiment is from Perfect Punches by Stampin Up!

 I used tinted embossing ink, and gold embossing powder on the butterfly and then cut it out.
What do you think?  What will you come up with?

Saturday, July 23, 2011

SCS Challenge Greeting Cards: Double Embossing & Thrifty Ribbon

Well, I've had a slow blogging week, so today I'm showing you two cards.  I've made them both for the Free For All Challenge over at Splitcoaststampers F4A74.  The challenge was to use two of things on the card.  I started by wanting to use some fabric for a ribbon.  I made a double bow (first for me) and I used the same image twice using the masking technique.

Here is the first card.
 I used pattern paper from DCWV, the base is Very Vanilla, and the stamps I used are from Fifth Avenue Floral by Stampin Up!.  I used regular colored pencils to color the flowers, and the "ribbon" is a torn strip from my hubbies favorite pajama bottoms that have seen better days.
I stamped the first flower to the left of the scallop oval (cut from the Storybook cartridge on my Cricut), and then I masked the image by stamping it onto a post-it and cutting it out.  I then placed the cut image on top of the first flower and stamped the second flower onto the scallop oval.
 I used Pumpkin Pie ink to stamp the flowers, and then Black for the sentiment.
 Here is my first double bow (I know, it leaves a lot to be desired!)

 Here is a close up of the stamped/colored images.
 Here is the strip of "ribbon" one I tore it from the pajama leg.
 Here are the pajama pants before I tore my ribbon.
One more final look at card one.

The second card today also qualifies for the F4A74 challenge, as well as the Ways to Use it challenge, WT332--Heavy Metal

 For the Two by Two challenge, I used two butterflies (cut from my Cricut and stamped with the set Delight in Life by Stampin Up!), two metal brad/buttons, and the double embossing technique.  The WT332 challenge is accomplished with the metal brads.
 Here is a look at my paper before and after the double embossing.  I started with a piece of Very Vanilla cardstock and used the Vintage Wallpaper embossing folder.  I then inked the entire pieces with brown embossing ink, and then used Kaleidoscope Transparent embossing powder from Stampendous.
 Here is a close up of the background once it was embossed with the heat gun.
 The base of this card is River Rock.
 The sentiment is from the Stampin Up set Trendy Trees.
 I added pearl embellishments to the sentiment and butterflies after inking them with brown around the edges.
Thanks for looking!  Happy Stamping!

Tuesday, July 12, 2011

Thrifty Scrapbook Tips: Chipboard and Acrylic Distress Tutorial

I apologize for today's post being later than usual.

In pasts posts I’ve shared with you some ways that I use the chipboard that I find around my home. It is really easy to find usable chipboard around your home. Toilet paper rolls, paper towel rolls, boxes from pasta, cereal, crackers, backs of used notebooks, soda packaging, packaging from scrapbook supplies…the list is endless. I have only shown you very few things that can be made with the chipboard you find around your house.


First I showed you a calendar, and then I showed you a notebook holder, and a box made from the packaging from crackers. Today I’m going to show you how to make great coordinating embellishments with chipboard and die cuts or Cricut machines. (Note that if you are using your Cricut machine you’ll want to ensure you have the deep housing blade).

First cut out the shapes you want to use on your project. In this case I created one label from my Cricut, and three from my Top Notes die and Cuttlebug. You can decorate these anyway you choose. You can cover them with pattern paper, ribbon, leave them “naked”…I chose to paint my pieces with Making Memories paints and then used my embossing folders and Cuttlebug to add dimension. As I mentioned, you these are great to use with this simple embossing, but I chose to use a technique to add even more pop to these items.


This is a label cut from the Storybook Cricut cartridge

After selecting a different embossing folder for each of the three Top Notes die cuts, I painted each a different base color: Chocolate, Marine, and Cantaloupe. The next step was to sand the raised images of these with sanding paper. These removed the paint from the raised sections to reveal “naked” chipboard again. This technique is referred to as Acrylic Distress. The last step was to choose a coordinating ink and use the direct to paper technique of running each pad over the embossed image.


I used the label from the Cricut to make the card for today.


Are you thinking about how you'll used your chipboard?  Let me know what you come up with!